Features (and defects) of handmade pressed Carnival Glass
by Glass Engineer (the late) Howard Seufer, with additional material provided by Glen & Stephen Thistlewood
Classic Carnival Glass was made from 1907 (and into the very early 1930s), which means that much of the earlier production is already over 100 years old. Unsurprisingly therefore, pieces will have damage! Damage: from the very obvious – such as a large chip or even a broken foot or handle – to the less significant, for which collectors have developed a whole vocabulary of descriptions, such as chip, flake, flea-bite, chigger, rough spot, and even “no-harm” damage. There is also damage caused by poor care over the years, such as over-cleaning or the use of abrasive cleaners which damage the very thin iridescent surface, leaving it open to oxidation and dullness.
However, here we are looking at the characteristics of Carnival Glass that are not damage as such, but are features of the way the glass was actually made. Inevitably, such features (especially the more serious or obvious ones) may be thought of as defects, but however a collector might view them, they do reflect the glass-making processes – at a time when “quality control” was less rigorous than modern-day consumers would expect.
Making Carnival Glass - a short summary of the processes.
Before we look at the features of handmade glass, it’s useful to outline the processes involved in making it. The processes, which had to be carried out in sequence and in a limited time span (whilst the glass was hot and still malleable) involved making the glass batch, gathering and pressing, and hand finishing.
The glass batch: this is the mixture of raw materials from which all glass is made, basically a mix of silica sand, soda ash and lime. Various other chemicals were added, for example as colourants, and cullet (broken /ground glass) may have been added. The batch was heated in a furnace to about 2500 degrees Fahrenheit, which created the “hot metal” – a workable, molten, viscous fluid.
|
Gathering and pressing. A gob or gather of the hot metal was wound onto the end of a metal rod (a gathering rod, ponty or pontil), and taken over to the press where a quantity was cut off the gob with shears and dropped into the mould. A plunger was immediately pressed down, squeezing the hot metal into the mould. Judging the amount of hot metal was crucial; too little and the mould wouldn’t be filled enough; too much and the glass would overflow the mould. The temperature of the iron mould had also to be just right - too hot, and the glass would stick to the mould. Some items were “blow moulded”. This technique was used where the shape of the item being made would not allow a plunger to move in and out of the mould – typically where the item was broader at the base than at the neck, such as a bulbous vase. Air pressure replaced the pressure exerted by the hand operated plunger. |
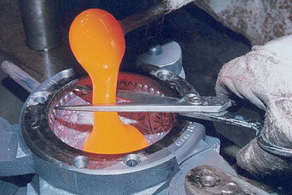
A gob of hot matal is cut from the gathering rod
with shears and dropped into the mould |
|
Hand finishing. The piece was removed from the mould and “snapped up,” * using a “snap” which fitted around the collar base (marie) of the glass item. The piece was then re-heated to make it pliable enough to be shaped in a variety of ways to give individuality. Then the glass was iridised - it was sprayed with a “dope” of metallic salts in solution. Lastly, the finished items were annealed - that is slowly cooled in a lehr to relieve stresses in the glass due to the heating / cooling processes and which could lead to cracking or breakage. * Another technique, where the item was “stuck up”, was used when the item did not have a collar base to accommodate a snap tool. The item was stuck (using a dab of molten glass) onto a pontil rod, and later removed after the item was finished. Removal from the pontil left a rough base rim, which was ground smooth – occasionally this process produced “grinding chips” on the base where the grinding caused slivers of glass to flake off. A word about moulds. The main body of the mould gave the basic shape of the glass object (for example a bowl or a tumbler) and its surface would usually have a pattern cut into it, this being the pattern which would appear, in relief, on the exterior of the glass. Moulds were generally hinged in two, three or four places, so that they could be opened up in order to easily remove the pressed glass item. A top ring fitted around the top of the mould: it held the body of the mould tightly closed, it created the shape of the top of the piece being pressed, and it guided the plunger in the centre of the mould so that the hot metal evenly filled the space between the mould and the plunger. Like the mould, the plunger would usually have had a pattern cut into it, which then came out on the interior of the finished piece. The mould also had a base or bottom plate. |
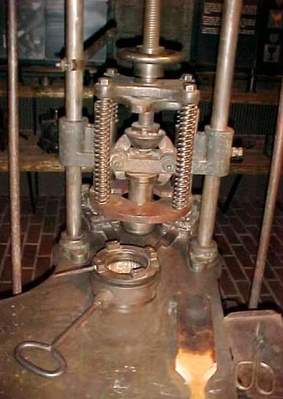
A typical set up of a side lever press (with plunger)
and a mould placed beneath it |
Features of handmade glassware by Glass Engineer (the late) Howard Seufer.

|
Sadly, Howard passed away in September 2017. Howard worked at Fenton since 1966. His knowledge of glass, its production and the context in which it was made, was extensive. Howard was well known for his many, wonderful educational presentations, in which he combined humour with knowledge. He was also a very skilled and experienced photographer. Howard's legacy lives on! His son, Marty, has embarked on a major tribute to Howard - the digitising of the (very many) videos that Howard made of glassmaking activities in the Fenton Factory. The first one records the making of this Woodsland Pine commemorative - a sea mist green plate. Click on the image on the right to see this amazing video. |

|
The explanations below, and the illustrative sketches are Howard's copyrighted work.
Features and Defects – some are harmful, some not!
It’s important to stress that Classic Carnival Glass was handmade and finished by hand, which brought about a range of marks that are visually apparent in the finished item – features that are due to the techniques used to actually make the glass. Some of these features do not cause any harm to the glass, although they may be unsightly and thus affect the visual appeal of the item. Conversely, when some of the features exceed the variations in the glass that were intended by the glassmaker, they are rightly considered to be defects and the more serious ones may be terminal to the ultimate survival of the item.
Fracture type marks.
|
CRACK – a sharp edged line at the surface that extends deeply into the item. This is a “deadly” defect; life threatening to the piece. A close examination will see the sharp edges as opposed to rounded or rolled edges to the line. Caused by tearing, ripping, impact, or by sudden temperature differences. 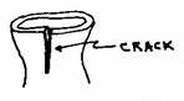
CRIZZLE – a very thin, very shallow wavy, sharp edged line that is healed; mostly found in pressed ware. Caused by the glass being formed coming in contact with a cold area of the mould or plunger. Found many times in or next to a mould joint. 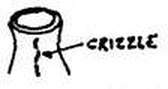
|
CHECK – a relatively short, straight, sharp edged line that doesn’t extend deeply into the item. This is usually a shallow healed crack that reflects light. Caused by the chilled skin of the pliable glass being subjected to further pressure or to sudden temperature differences before the deeper glass gets chilled. 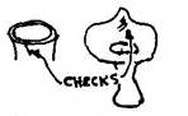
TEAR – a rip in the surface, relatively deep; looks like a cut in the glass. Caused by pliable glass pulled apart upon opening of a mould, or during reheating/stretching operations. 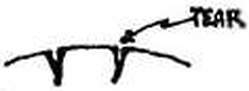
|
Continued on page 2: Non-Fracture type marks, Other marks and Variations.
And on Page 3: a look at the various crimping tools that were used in the Fenton factory.